Pipe Markers Guide: Everything You Need About Pipe Marking and Labeling


Many commercial locations today are a maze of wires and pipes that carry liquids and gases throughout the building. Facilities management and related teams must ensure that applicable regulatory guidelines are met while maintaining a safe work environment. The transportation of hazardous materials is an obvious safety risk, and even water damage can have a devastating impact on a facility.
A Hazard Information Bulletin released by the Occupational Safety and Health Administration (OSHA) during the mid-1990s is an important reminder of the potential risks. The document highlights some historical examples of deaths and injuries that resulted from chemical exposures which happened during work on valve and piping systems. While these incidents have led to additional engineering controls, monitoring technology, and training requirements that have improved our workplaces today, it is not possible to eliminate all risk.
Developing an organized and clean environment is the hallmark of any well-run commercial location, and pipe marking plays an important role in this. Pipe markings allow anyone to quickly identify the contents and direction of flow for each pipe within a facility. For some unique cases, such as ammonia refrigeration, there may be additional information provided on a label, such as physical state and pressure level.
National and international standards do a great job of unifying these markings so that any trained professional can quickly understand what hazards may be present. Proper pipe marking can lead to better safety incident management, streamlined routine maintenance, and more rapid facility improvements.
We’ve created this guide to provide an overview of pipe marking and labeling basics, as well as standards, requirements, and important considerations for pipe marking projects

There are a wide variety of standards for pipe marking that could apply to a facility depending upon the industry, region, and type of materials that are supplied on site. Both national and international regulations may be relevant. Below are a few of the most prevalent pipe marking standards companies should be aware of.
The American Society of Mechanical Engineers (ASME) and American National Standards Institute (ANSI) maintain standard ANSI/ASME A13.1, which is the most widely adopted pipe identification standard in the U.S. This standard requires primary identification of the pipe contents and flow and secondary identification of the class of material via color-coding. There is also a requirement, as of 2015, to add GHS pictograms to identify specific hazardous material risks to health and safety.
Created through a collaboration between the National Fire Protection Association (NFPA) and The Compresses Gas Association (CGA), the standard NFPA 99/CGA C-9 applies to gas lines used in medical facilities. Some of these gases can present a specific fire risk. A simple color-coding system is used to identify the contents of any pipe.
The International Organization for Standardization (ISO) regulates the identification of marine piping used in sea vessels through ISO/DIS 14726. This system uses two-part color-coding, in which the main color identifies the overall class of material, such as freshwater or flammable gas, and a second color stripe identifies the specific material.
The International Institute of Ammonia Refrigeration (IIAR) first released IIAR Bulletin 114 in 1991 to standardize ammonia refrigeration piping identification among users. The bulletin specifies abbreviations, along with markings for physical state and pressure level. It was revised in 2014 to align with updates made to ANSI/ASME A13.1, including an adjustment to the color scheme and other important formatting.
The British Standard (BS) 1710 specifies requirements for pipe markings used in the United Kingdom. There are two types of color-coding that are used, including a base color to identify the pipe contents and a secondary color band to identify safety hazards. Additional requirements for naming, abbreviations, and chemical symbols are also outlined in these regulations.
One final set of pipe marking standards that provides some useful context is the Indian Standard (IS) 2379. These standards, used for pipe marking requirements in India, take a very detailed approach that uses a base color, secondary band color, and letters to identify the pipe contents. There are also some specific guidelines given for the placement of labels in relation to the piping layout.

OSHA remains the central resource for workplace safety in the U.S., and its guidelines cover a wide range of topics. While OSHA does specify requirements for many areas, they may also reference other standards instead of creating their own. This is the case for pipe marking, as the standard OSHA 1910.261(a)(3)(ii) simply refers to ANSI standard A13.1 without detailing any additional requirements set forth by OSHA.
Since the OSHA standards do not specify requirements for pipe marking, one could interpret this as meaning that OSHA does not require companies to follow any particular standards. The reason why the majority of businesses choose to fully comply with ANSI/ASME A13.1 is that the OSHA standards, while general, still require you to keep your work environment safe from any known hazards. Following the ANSI standards ensures that you are using accepted techniques for pipe marking, which will also keep you well within OSHA regulations.
In addition to pipe marking, many industries use Piping and Instrumentation Diagrams (P&IDs) to visually represent entire piping systems. These diagrams complement pipe marking in ensuring safety and efficiency.

Pipe markings can refer to any number of identifying labels placed on sections of a pipe during manufacturing or at any point during their use. Manufacturers mark their pipes and connectors with specifications for size, length, and other important information based on the type of hardware and material of construction. These markings are typically created as alpha-numeric characters that are drawn or etched directly onto the pipe. Such information is very useful to engineers and contractors during the construction of new facilities.
Pipe marks can also refer to labeling that is added after installation to identify the contents of any section of piping in a facility. To properly read a label, it is first important to familiarize yourself with the regulations the facility is following for compliance. In addition to any required standards, some facilities may choose to implement additional voluntary labeling practices.
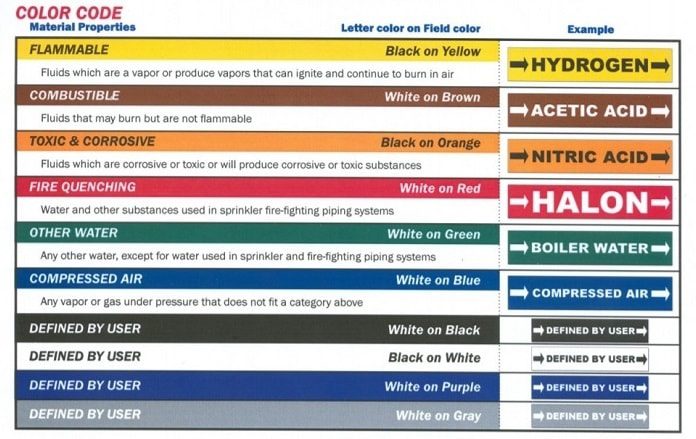
In general terms, based upon ANSI/ASME A13.1, the primary visual indicator of a pipe marker will be the color. The color is significant, as it conveys the class of material that is transported within the pipe, such as flammable, toxic, or fire quenching. This will be followed by bold text on the label that will define the exact material. An arrow should also be present to indicate flow direction, and additional details for temperature or pressure may also be visible. Together, this information gives the reader a concise and effective summary of the pipe contents.

Screenshot via PPSA.org
ASME/ANSI A13.1 defines the coloring of pipe markers in a chart that includes the following designations. For hazard classification purposes, the most hazardous component of any piping line should dictate the color that is chosen.

In addition to the color-coding scheme mentioned above, the standard ANSI/ASME A13.1 also includes requirements for the content, sizing, and placement of pipe markers. The overall goal of these guidelines is to ensure that all pipe markers placed within a facility are visible and easy to read. Any confusing or missing information could put a site at risk.
The pipe marker must include additional information that can be used to identify the exact material that is present within the pipe. Users can choose from any combination of full name, abbreviation, or chemical symbol to identify the pipe contents. This is in addition to any appropriate code indications or code color bands that may be used. Some locations also choose to add a CAS# to the pipe marker for specific confirmation of the exact contents. In addition, an arrow should be placed on the marker to indicate the direction of flow.
Since pipes can come in a variety of shapes and sizes, the specifications also define the proper sizing of a pipe marking. The size of a pipe marking label is set based on the pipe diameter as follows:
A pipe marker label should be visible from any direct line of approach, meaning that it should be placed in the best location based on the field of view within the area. For an overhead pipe, for example, the label should be placed at the bottom of the pipe so it can be seen directly when glancing up. In addition to the orientation on the pipe surface, the following specific requirements for placement are also given:

Whether planning a labeling project for a new facility or updating existing pipe markings, it’s important to carefully consider the environment. Each location will present its own unique challenges, and pipe markings must be visible and readable in order to be effective. In addition to general safety awareness best practices, these are a few important factors that may impact your pipe marker label selection and placement.
The visibility of pipe marker labels is paramount, because if they can’t be seen clearly, they have little use for anyone. Once the piping layout has been set, carefully consider how each supply line moves within the facility including the entry and exit points for each room. Pipe markers will need to be placed at regular intervals along each pipe as dictated by industry standards, and it’s important to get an accurate count of label quantity based on the various sizes required. This will help you properly plan for adequate visibility of the labels on the piping throughout the building.
Cleanliness is especially important for certain parts of your facility, such as access hallways or sub-floors that may not be accessed often. You want to make sure that pipe markers are not placed in a location that can get easily covered by dirt, grime, or moisture. It is also helpful to develop an adequate maintenance plan that will ensure that these locations are checked regularly for any deteriorating conditions that may impact the ability to read important signs and labels.
Some pipes may be carrying particularly hazardous materials, such as those which are corrosive or others kept at high temperatures. You want to select a pipe marker label material that can withstand the expected conditions. An improper label that is placed on a hot pipe could quickly deteriorate and lead to reduced readability. Another example may be a label that is placed on a pipe that is exposed to long periods of direct sunlight, which can cause a label to fade, which also reduces readability. Ultimately, in the case of a safety incident or leaky or burst pipe, it is helpful to have pipe markers that can withstand potential exposure to the materials within so that safety personnel can properly identify the material and contain the spill.
When properly organized and planned, pipe marking can be a very straightforward and valuable process for facilities of all types. Since regulations are updated over time, it’s important for management at any site to stay up to date on the latest developments and best practices. By selecting and applying proper pipe marker labels to your supply lines, you will ensure that you are in compliance with regulations and can depend on your safety awareness procedures for years to come.
Our sales engineers are experts in automatic asset tracking, tagging and identification,a nd can answer all your questions. Get in touch now.
Lets Talk ›Enter your information and get a free checklist of the top questions to answer and tips to plan a successful asset tagging project for any asset management or tracking system implementation.