




































Warehouse Layout Design: Types, Principles and a 7-Step Planning Guide (2026)


The average U.S. warehouse now runs 222,620 square feet, holds 9,565 SKUs and still hits only 75% space utilization at its busiest, according to the 2025 Warehouse/DC Operations Survey from Modern Materials Handling and Peerless Research Group.
Warehouse layout design is the process that closes that gap. It decides where receiving, storage, picking, packing and shipping sit, how wide the aisles run and which direction product moves between them, and it sets labor cost before anyone clocks in: order picking absorbs roughly 55% of a warehouse’s operating budget and travel absorbs about half of every picker’s shift, per the de Koster, Le-Duc and Roodbergen review in the European Journal of Operational Research.
Walking is a layout decision. So is the location of your dock doors, the width of your aisles and whether a new hire can find bin 14-C-07 without asking.
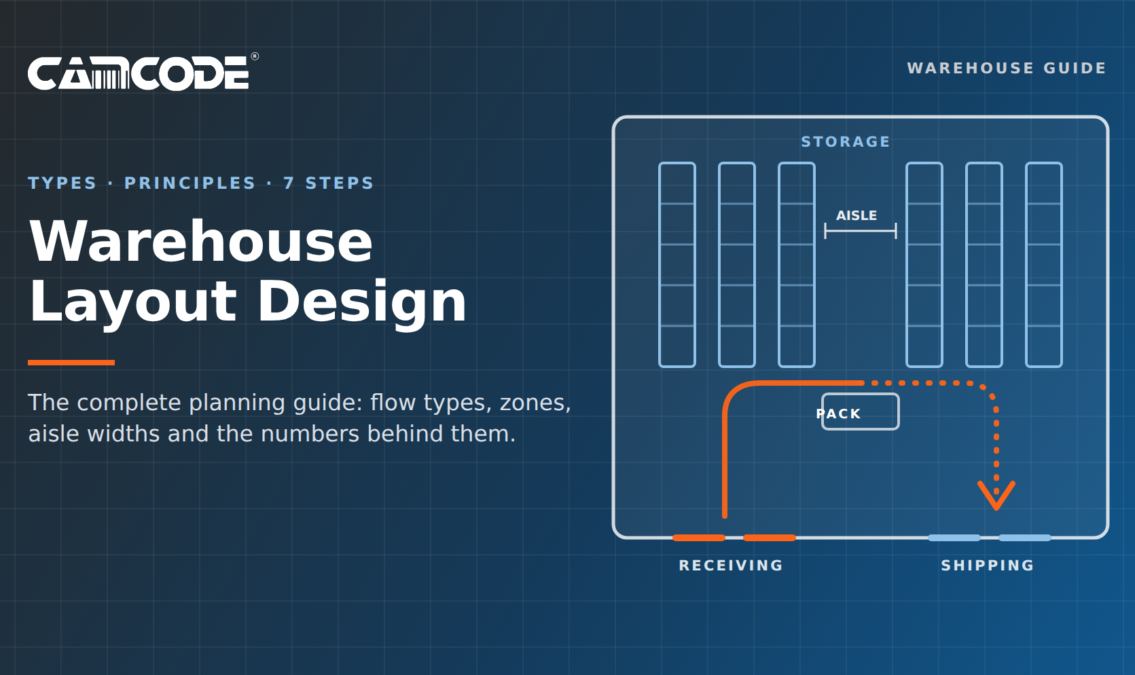
This guide covers the six functional zones, the U, I, L and cross-dock layout types, the design principles behind a good layout, aisle widths by forklift class, the software worth using and a seven-step process for designing a warehouse layout of your own.
Warehouse layout design is the process of arranging a facility’s receiving, storage, picking, packing and shipping zones, plus the aisles, racking and equipment paths that connect them, so that product moves through the building with the least travel, handling and risk.
A layout is a physical plan: where the docks sit, how the racks run, how wide the aisles are and which direction traffic flows. Layout design is the set of decisions behind that plan.
The distinction matters because most warehouses were never designed at all. They were inherited, then filled.
The 2025 MMH survey (101 facilities, fielded August 2025) put the average facility at 222,620 square feet with 9,565 SKUs, and 33% of respondents said they plan to add square footage.
That’s a lot of floor about to be laid out for the first time or re-laid, and the difference between a good plan and a bad one shows up in labor cost every single day afterward.
A warehouse layout design determines labor cost, storage capacity and injury exposure before anyone clocks in. Here is what the research says about each.
Let’s look at labor first. Because picking is the largest cost center and travel is the largest slice of picking time, the geometry of the pick path is the single biggest lever a manager has that doesn’t involve hiring or automation. Shortening the average pick route by a fifth is a layout project, not a training project, and it’s the first item in any serious warehouse optimization effort.
The consultants who redesign warehouses for a living put it more bluntly:
“Fifty percent of the time tied up in pick processes is devoted to travel. If you put the right products in the right places and select the right pick paths, you can maximize velocity and reduce as much as 50% in time and labor during the picking process.”
– Bryan Jensen, Chairman and Executive Vice President, St. Onge Company, in Modern Materials Handling, October 2021
That figure has held up. St. Onge partner Norm Saenz put order picking at “up to 50% of the total labor cost” in January 2026, which is the current read on a number the field has worked from since 2007.
Capacity is second. The same 2025 MMH survey found facilities running at 75% average space utilization at peak, with an average clear height of 31.8 feet. Most buildings are not out of space. They are out of well-organized space, usually because racking was placed for the SKU mix of five years ago.
Cost of space is the third factor to consider. Cushman & Wakefield’s Q2 2026 U.S. Industrial MarketBeat reports national vacancy at 6.9% and asking rents up 2.9% year over year. Every square foot you recover through a smarter layout is a square foot you don’t lease or build.
Safety is last, but it isn’t a small item. OSHA’s warehousing page names the two most common warehouse injuries as musculoskeletal disorders from lifting and being struck by powered industrial trucks. Both are shaped by layout: where heavy items live relative to waist height, and whether pedestrians and forklifts share the same aisles.
Layout is the first control in any warehouse operations program, because it decides what the other controls have to work around.
Every warehouse layout design is built from the same six zones, and the order they sit in decides how product flows. Get the zones and their sequence right before you draw a single rack.
A useful rule from practice: draw the path a single carton takes from the inbound trailer to the outbound trailer, then measure it. If that line crosses itself anywhere, the zone order is wrong.
Warehouse layout types are named for the path product takes through the building. U-shaped flow puts receiving and shipping on the same wall, I-shaped (or through-flow) puts them on opposite walls, L-shaped puts them on adjacent walls and a cross-dock removes the storage stage altogether. Each fits a different building and a different operation.
U-shaped layout. Receiving and shipping share one side of the building, with storage curving around the back. Because docks are shared, staff and equipment can flex between inbound and outbound work, and the building needs only one truck yard. It’s the most common layout for facilities under about 150,000 square feet and for any operation with a lot of cross-docking. The weakness is dock congestion at peak, when inbound and outbound trucks compete for the same doors and the same yard.
I-shaped (through-flow) layout. Receiving on one end, shipping on the other, storage in a straight run between them. Product moves in one direction, which keeps inbound and outbound traffic fully separated and suits high-volume, high-throughput operations with predictable SKU velocity. The cost is two truck yards, two sets of dock equipment and two teams, plus a long building footprint that not every site can accommodate.
L-shaped layout. Receiving on one wall, shipping on an adjacent wall, with product turning 90 degrees through storage. It separates the two traffic streams like an I-shape but fits an irregular site or a building with docks on two sides. It also creates a natural fast lane along the short leg for high-velocity items. The awkward corner where the two legs meet tends to become dead space unless you plan it deliberately.
Cross-dock (flow-through) layout. Usually counted as the fourth warehouse layout type, a cross-dock is an I-shaped building with the storage stage taken out: inbound freight is sorted on the dock and moved to outbound doors, typically inside 24 hours. These buildings are narrow, dock-heavy and hold very little racking. The layout only works when inbound freight already matches outbound demand, which in practice means a mature supplier program or a retail DC replenishing known stores. Most operations run a cross-dock lane inside a U-shaped or I-shaped building rather than converting the whole site.
 ■CAMCODE
Warehouse layout types
| Layout type | Best fit | Main strength | Main weakness |
|---|---|---|---|
| U-shaped Shared docks |
Under ~150,000 sq ft, cross-docking, single yard | Shared docks and flexible labor | Dock congestion at peak |
| I-shaped Through-flow |
High-volume through-flow, long sites | Fully separated inbound and outbound traffic | Two yards and a long footprint |
| L-shaped Corner turn |
Irregular sites, docks on two walls | Separation plus a natural fast lane | Dead space in the corner |
| Cross-dock Minimal storage |
Pre-sorted inbound, retail replenishment | Almost no storage cost or pick labor | Fails if inbound doesn’t match outbound demand |
One caveat from the field: the flow type is set by the building’s dock positions more often than by the operation. If you’re leasing an existing shell, the shape is usually already decided and the real design work is inside it.
Good warehouse layout design follows six principles: flow, accessibility, space, throughput, safety and flexibility. These are the best practices every decision in the planning process should be checked against.
Flow. Product should move in one direction with no backtracking and no crossing paths. Receiving never shares an aisle with shipping.
Accessibility. Every pallet position and every bin should be reachable without moving something else first. Double-deep and drive-in racking trade accessibility for density, so use them only for SKUs with many pallets per item.
Space. Use the cube, not the floor. With average clear heights now above 31 feet per the 2025 MMH survey, a facility still racking to 20 feet is leaving a third of its capacity empty.
Throughput. Place the fastest 20% of SKUs (by pick lines, not by revenue) closest to packing and at the most ergonomic pick height, between knee and shoulder. This is the ABC slotting principle, the Pareto split that gives ABC analysis its name: A items are the small share of SKUs driving most pick lines, B items the middle band and C items the long tail that can sit in reserve or on upper levels. Slotting to that split does more for pick rate than any equipment purchase short of automation.
Safety. Separate pedestrian and forklift traffic physically wherever possible, mark crossings and speed limits with warehouse signs, keep aisles clear of staged product and keep heavy items low. OSHA does not set a fixed aisle width, but it does require that aisles used by powered trucks be kept clear and marked, and it holds the employer responsible for adequate clearance under 29 CFR 1910.176.
Flexibility. Design for the SKU mix and volume you expect in three years, not the one you have today. Modular racking, movable pick modules and 20% to 30% headroom in every zone are cheaper than a second redesign.
Designing a warehouse layout takes seven steps: gather data, map the building, define zones, choose the flow type, size aisles and racking, set the slotting and location scheme, then test and adjust. Here is each one in practice.
Step 1: Gather the data that drives the design. You need at least 12 months of inbound and outbound volume by day, pick lines per order, SKU velocity (lines per SKU per month), SKU dimensions and weights, pallets on hand per SKU and your peak-to-average ratio. Without this, every later decision is a guess. If your WMS can’t produce it, export shipping records and work backward. If you are starting a facility from scratch, Camcode’s guide to how to set up a warehouse covers what else has to happen alongside the layout.
Step 2: Map the building. Get an accurate floor plan showing columns, clear height under joists and sprinklers, dock door positions, floor load rating, electrical and fire exits. Column spacing decides your rack row lengths and aisle positions before you decide anything else. For a walkthrough of this step, see Camcode’s guide to how to design a warehouse floor plan.
Step 3: Define and size the zones. Warehouse zoning starts with peak-day volume. Assign square footage to each of the six functional zones, then run an ABC analysis over the SKU list so you know how much forward pick space the A items actually need before sizing reserve storage. The zone sizing rules that matter: receiving and shipping staging together should hold at least one full peak day of throughput on the floor, forward pick should be sized to the A band rather than to the whole catalog and every zone carries 20% to 30% growth headroom.
Step 4: Choose the flow type. Pick U, I, L or cross-dock based on dock positions, site shape and how much you cross-dock. Then draw the single carton path described above and confirm it never crosses itself.
Step 5: Size the aisles and select racking. Aisle width follows from the equipment, and equipment follows from your density target. The section below gives the numbers.
Step 6: Set the slotting and the location scheme. Assign fast movers to the golden zone near packing and slow movers to reserve, then give every position a unique, scannable location ID. Camcode’s guide to warehouse location mapping covers the numbering logic.
Step 7: Test, then adjust. Simulate a peak day on paper or in software, walk the pick paths with the people who will use them and measure travel distance for your ten most common order profiles. Expect to change something. Then plan a slotting review every quarter, because the SKU mix that drove the layout will drift within a year.
You do not need CAD to plan a warehouse layout, but you do need something that holds scale and lets you count pallet positions. Warehouse layout design software falls into four groups, and the right one depends on how far past the sketch you need to get.
Free online layout planners. Browser tools such as SmartDraw, Icograms and Planner5D let you drag docks, racks and aisles onto a scaled floor plan and export a PNG or PDF. They are the fastest way to test a zone arrangement and they cost nothing to try. They do not model travel distance or pick rate, so treat the output as a drawing rather than an answer.
Free warehouse floor plan templates and layout generators. A warehouse layout template is the fastest way to skip the blank page. Free floor plan generators and warehouse layout templates give you a scaled grid with dock, rack and aisle symbols you can drag into place, and most export to PDF or PNG. A warehouse layout template in Excel covers the other half of Step 3, because zone sizing is arithmetic: square feet per zone, pallet positions per aisle, staging lanes per peak day. Use a floor plan template for the drawing and a spreadsheet for the numbers, and get the numbers right before anyone draws a rack.
CAD and BIM. AutoCAD, Revit and SketchUp give dimensional accuracy against a real building survey, and most racking suppliers will quote from a DWG file. Move here once the flow type and zone sizes are settled, not before.
Simulation and slotting tools. Pick-path simulation and WMS slotting modules are the only category that answers whether a layout is actually faster, which is what Step 7 asks. They are priced accordingly, and they earn their cost when the change they validate is big enough to move picking labor.
Start with the numbers, then draw. The free warehouse layout planner below sizes zones, aisles and pallet positions from your own volumes and hands you figures to carry into whichever drawing tool you choose.
CAMCODE
Warehouse layout planner
Answer four questions to see which flow type fits your building, then estimate how many pallet positions your storage zone can hold at each aisle width.
Pick an answer for each question to see a recommendation.
Module width = aisle width + rack depth. Rack share = rack depth / module width. Rack floor area = zone area × rack share × 0.85 (15% allowance for cross aisles, columns and end-of-aisle clearances). Positions per level = rack floor area / 16 sq ft per pallet position (48 × 40 in pallet plus clearances). Beam levels = floor((clear height − 1.5 ft of top clearance) / (pallet height + 0.5 ft)), capped at the truck’s practical lift height. Aisle widths: OSHA Powered Industrial Trucks eTool (counterbalance about 12 ft) and BigRentz’s aisle width guide (reach 8 to 10 ft, VNA 5.5 to 6.5 ft). Double-deep hides the rear pallet, so accessibility drops to about 50%.
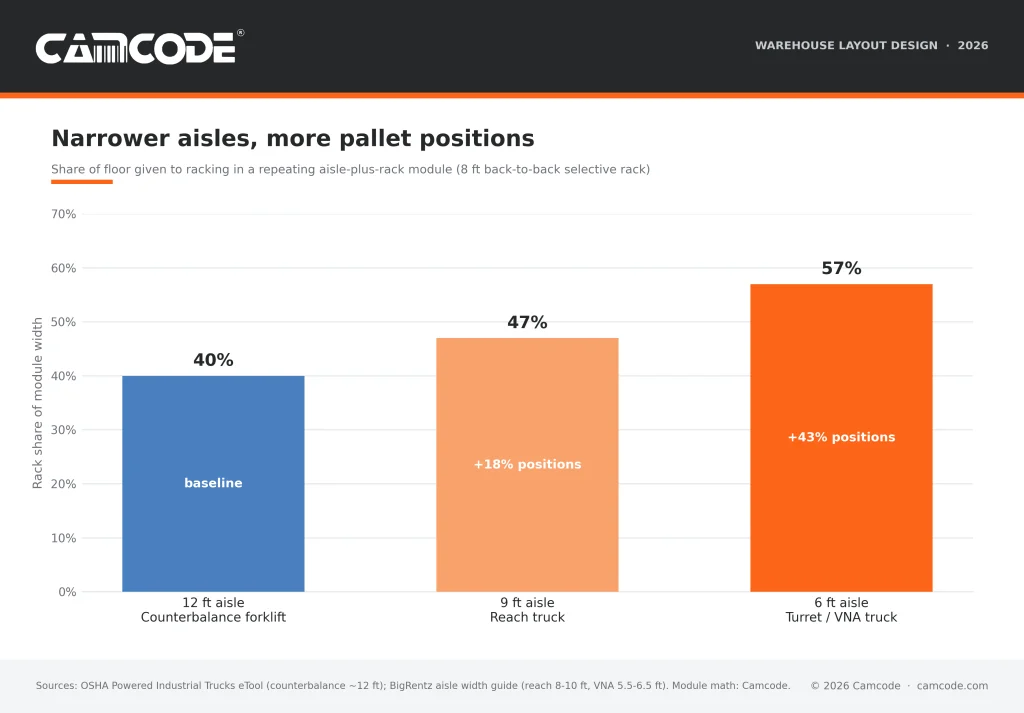
Aisle width is the single dimension that most affects warehouse storage capacity, because every foot of aisle is a foot not holding product. The trade-off is equipment cost: narrower aisles need more specialized, more expensive trucks.
OSHA’s powered industrial truck eTool notes that conventional rack storage was designed around the counterbalanced lift truck, which needs about a 12-foot aisle. Industry planning guides such as BigRentz’s forklift aisle width guide put reach trucks at 8 to 10 feet and very narrow aisle (VNA) equipment, meaning order pickers, turret and swing-reach trucks, at 5.5 to 6.5 feet.
The often-quoted “4-foot minimum” comes from a 1972 OSHA interpretation letter and isn’t in the current standard; what OSHA actually requires is enough clearance for the truck, its load and the movements needed to operate it.
Here is a worked example we use when scoping rack labeling projects:
The catch is that a turret truck costs several times what a counterbalance truck does and needs wire or rail guidance in the aisle, so the math only works when the space you save is space you’d otherwise lease or build.
Racking follows the same logic. Selective pallet racking gives 100% accessibility at the lowest density. Double-deep roughly doubles density per aisle but hides the rear pallet. Drive-in, push-back and pallet flow go denser still and suit SKUs with many pallets per item.
Match the rack type to the pallets-per-SKU profile from Step 1, not to a single density target for the whole building. Camcode’s guides to warehouse storage systems and warehouse racking layout go deeper on rack selection.
A warehouse layout is only as usable as its location system, because a pick path a WMS can’t direct and a new hire can’t follow is a pick path that exists only on the drawing. In our experience installing rack and floor labels across a wide range of facilities, the layout drawing and the labeling scheme are almost always produced by different people at different times, and the seams show.
Three things go wrong most often.
A warehouse location ID should read like an address, largest unit to smallest: aisle, then bay, then level, then position. In 14-C-07, aisle 14 is the aisle, bay C is the rack section along it and 07 is the pallet position within that bay, counted the same direction in every aisle. Add a fourth field when racking runs deep enough that level and position need separating, as in 14-C-03-2.
Three numbering rules keep the scheme usable:
The fix is to design the location scheme in Step 6 as part of the layout, not after it. Number aisles in the direction of flow, run bins serpentine so a picker never doubles back, put the aisle and bay ID on a rack label at eye level and repeat the aisle ID on a floor label at the aisle mouth where a forklift driver can read it without stopping.
Every location ID should scan with a single barcode read from the aisle. Camcode’s guide to how to label warehouse racking covers placement heights, material choice and barcode symbology in detail.
The most common warehouse layout mistakes are undersized receiving, aisles sized for the wrong truck, slotting by revenue instead of pick frequency, racking below the clear height and designing for today’s volume with no headroom. Each has a fix.
Undersized receiving and shipping staging. Inbound freight arrives on the carrier’s schedule. If staging can’t hold a peak day, pallets end up in aisles and every other zone slows down. Fix: size staging for peak, then protect it with floor markings so it isn’t quietly absorbed into storage.
Aisles sized for the wrong equipment. Twelve-foot aisles with reach trucks give up close to a fifth of the pallet positions the same floor could hold. Six-foot aisles with a counterbalance truck cause rack strikes. Fix: pick the truck first, then the aisle.
Slotting by revenue or by product family. The SKUs that generate the most pick lines are not always the ones that generate the most revenue, and grouping by supplier or category is convenient for buyers, not for pickers. Fix: slot by pick lines per month, review quarterly.
“Slotting is not a one and done. It needs to be reviewed and, if necessary, adjusted every quarter.”
Bryan Jensen, Chairman and Executive Vice President, St. Onge Company, in Modern Materials Handling, October 2021
That quarterly cadence is the cheapest item on this list and the one most often skipped.
Racking to the old clear height. A building with 32 feet under the joists and racking at 20 feet is paying rent on empty air. Fix: check sprinkler and fire-code clearances and go up.
No headroom. A layout at 95% utilization on opening day has nowhere to go. The 2025 MMH survey’s 75% peak utilization figure is a reasonable design ceiling. Fix: reserve 20% to 30% growth capacity in each zone.
Location scheme bolted on afterward. Covered above. Fix: design it in Step 6, with durable labels, before go-live.
There isn’t a single best warehouse layout, because the right one depends on dock positions, site shape and how the operation moves product.
U-shaped layouts are the most common choice for facilities under about 150,000 square feet and for cross-docking operations, because shared docks let labor and equipment flex between inbound and outbound.
I-shaped layouts suit high-volume, one-direction throughput and L-shaped layouts fit irregular sites or buildings with docks on two walls.
The four warehouse layout types most often listed are:
The first three are flow shapes named for the path product takes between receiving and shipping. The fourth, the cross-dock or flow-through layout, removes the storage stage entirely and moves freight from inbound doors to outbound doors within about 24 hours.
Counts vary by source, so you will also see lists of three that drop cross-docking and lists of five that add island or cellular arrangements.
Those last two describe how storage is grouped inside a building rather than how product flows through it.
Warehouse aisle width depends on the forklift: about 12 feet for a counterbalanced truck, 8 to 10 feet for a reach truck and 5.5 to 6.5 feet for very narrow aisle order pickers and turret trucks, per OSHA’s powered industrial truck eTool and standard planning guides.
OSHA doesn’t set a fixed minimum width, but 29 CFR 1910.176 requires aisles to be kept clear, marked and wide enough for the truck, its load and its turning movements.
A warehouse layout has six main areas:
Product should move through the first five in that order without backtracking, and support areas should sit off the main flow path.
Yes. Free browser-based layout planners such as SmartDraw, Icograms and Planner5D produce a scaled 2D warehouse floor plan and export it as an image or PDF.
Also, Camcode’s warehouse layout planner (featured above) sizes zones, aisles and pallet positions from your own volumes at no cost.
Free tools handle the drawing and the arithmetic. They do not simulate pick paths or travel time, which is where paid simulation and slotting software starts to matter.
The fastest improvements to an existing layout are re-slotting so the top 20% of SKUs by pick lines sit closest to packing, fixing the location numbering so pickers travel serpentine rather than doubling back and relabeling so every location scans reliably.
These changes typically take days rather than months and address the travel-time component that makes up about half of picking labor.
Review slotting quarterly and the overall layout annually or whenever SKU count, order profile or volume changes by more than about 20%.
The 2025 MMH survey found the average facility’s SKU count rose from 7,790 to 9,565 in a single year, which is enough drift to invalidate a slotting plan.
Our sales engineers are experts in automatic asset tracking, tagging and identification, and can answer all your questions. Get in touch now.
Lets Talk ›Enter your information and get a free checklist of the top questions to answer and tips to plan a successful asset tagging project for any warehouse management system implementation.